




Your next customer might not be human. AI agents running inside ChatGPT, Gemini, and similar platforms are already completing purchases on behalf of real people, and the merchants ready for them have crypto payment infrastructure already in place.
Knowing how to integrate crypto payments with Shopify and WooCommerce used to be a developer’s problem.
Right now, with plugin ecosystems mature and protocols standardized, it’s a 20-minute setup with implications that go well beyond Bitcoin at checkout.
First things first
What a Crypto Payment Gateway Actually Does
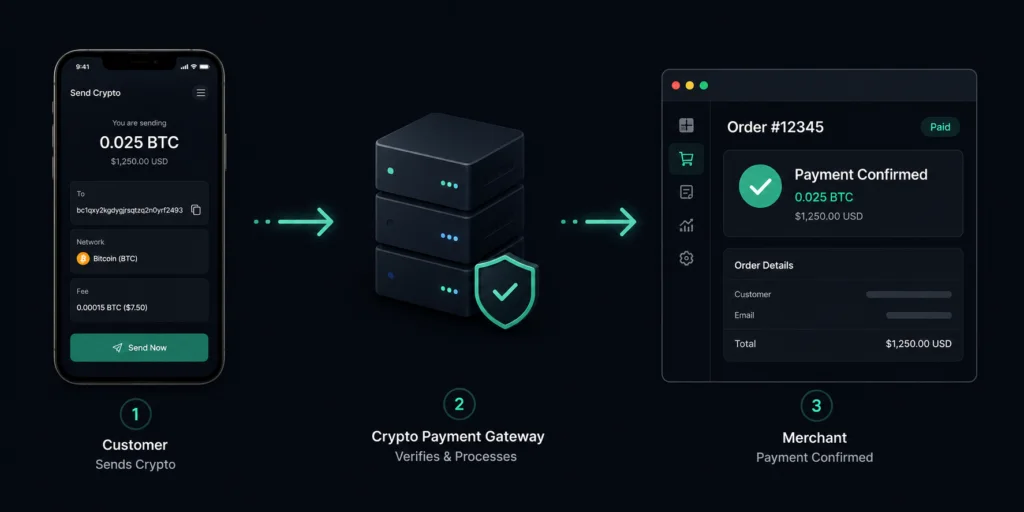
When a customer selects crypto at checkout, your store sends a request to the payment gateway. The gateway generates a unique wallet address and a QR code for that specific order amount.
The customer sends the crypto from their wallet. The gateway monitors the blockchain for incoming transactions. Once confirmed, it sends a notification back to your store, which then updates the order status automatically.
If you have opted for fiat settlement, the gateway converts the crypto to your local currency and sends the payment to your bank on a regular schedule.
The key thing to understand is that you, as the merchant, never have to touch a crypto wallet or manage a blockchain transaction yourself.
The gateway handles all of that. Your job is to choose the right one, connect it to your store, and test it before customers start using it.
A cryptocurrency payment gateway allows businesses to accept digital currencies as payment for goods and services. It acts as a bridge between the customer’s crypto wallet and the merchant’s payment system, handling real-time exchange rate calculations, transaction confirmation monitoring, and optional fiat conversion. Merchants benefit from instant settlement, borderless transactions, and zero chargeback risk.
Shopify vs WooCommerce: Which One You Are Working With Matters
The integration process is different for each platform, and it is worth understanding why before you start.
Shopify is a closed, hosted platform.
That means Shopify controls what apps can integrate with it. Every app goes through Shopify’s review process before it appears in the App Store.
For merchants, this is actually useful when it comes to crypto payments, because it means any gateway app you install from the Shopify App Store has passed a basic level of vetting.
The integration process involves finding the app, installing it, entering your API credentials, and activating the payment option. You do not need to write a single line of code.
Shopify’s fee structures for third-party gateways are plan-dependent and evolve frequently. It is essential to consult the official Shopify pricing page for current policies and plan-based exemptions before committing to a provider.
WooCommerce is an open-source plugin for WordPress. According to Cloudways’s WooCommerce crypto guide, WooCommerce powers roughly 40% of all online stores worldwide.
Its open-source architecture gives you complete control over every layer of your store, including the checkout flow.
You can install any compatible plugin, customise it with hooks and filters, and connect any gateway that provides a WordPress plugin.
The trade-off is that there is no App Store safety net. You install a plugin, and the responsibility for compatibility, security updates, and conflict resolution falls on you.
The implication for crypto specifically: with Shopify, you are somewhat protected from bad gateway integrations because Shopify vets apps.
With WooCommerce, as AurPay’s payment gateway guide points out, the WordPress plugin ecosystem carries many abandoned crypto payment plugins, with unmaintained code that can break whenever WordPress updates.
You have to check each plugin carefully before installing it.
How to Add Crypto Payments to Your Shopify Store
The whole process for Shopify takes less than an hour if you have your merchant account set up with the gateway beforehand.
Step 1: Choose Your Gateway and Create a Merchant Account
Before you touch Shopify, go to the gateway’s website and sign up as a merchant. The main options with Shopify App Store presence in 2026 are:
- CoinGate: Supports over 70 cryptocurrencies, auto-converts to fiat, 1% fee, and is one of the most established Shopify integrations available. Used by over 5,000 merchants globally.
- NOWPayments: The lowest platform fee at 0.5%, supports over 300 coins, including major stablecoins, and offers both hosted checkout and API integration.
- Coinbase Commerce: Built by Coinbase, supports BTC, ETH, USDC, and a handful of other assets. Full custody of your funds, no exchange needed. 1% fee on transactions.
- Triple-A: MAS-licensed gateway with strong compliance credentials. Supports fiat settlement in major currencies. Better suited for higher-volume merchants.
During registration, you will need to complete KYC verification. Have your business documents and identity documents ready.
Approval typically takes one to two business days.
Step 2: Install the Shopify App
Once your merchant account is approved and you have your API credentials, go to the Shopify App Store and search for your chosen gateway.
Install the app, and it will ask you to authorise access to your store. This is standard for all Shopify payment integrations.
Also Read: Best Crypto Payment Gateways in 2026: A Complete Guide
Step 3: Enter Your API Keys
Inside the app settings, you will find fields for your API key and API secret, sometimes called a merchant key and a salt, depending on the provider.
Copy these directly from your gateway merchant dashboard. Do not type them manually. A single wrong character will break the integration silently, and you will not know until a payment fails.
You will also see settings for which currencies to accept, whether to auto-convert to fiat, your settlement currency, and your payout schedule. Configure these before testing.
Step 4: Enable at Checkout
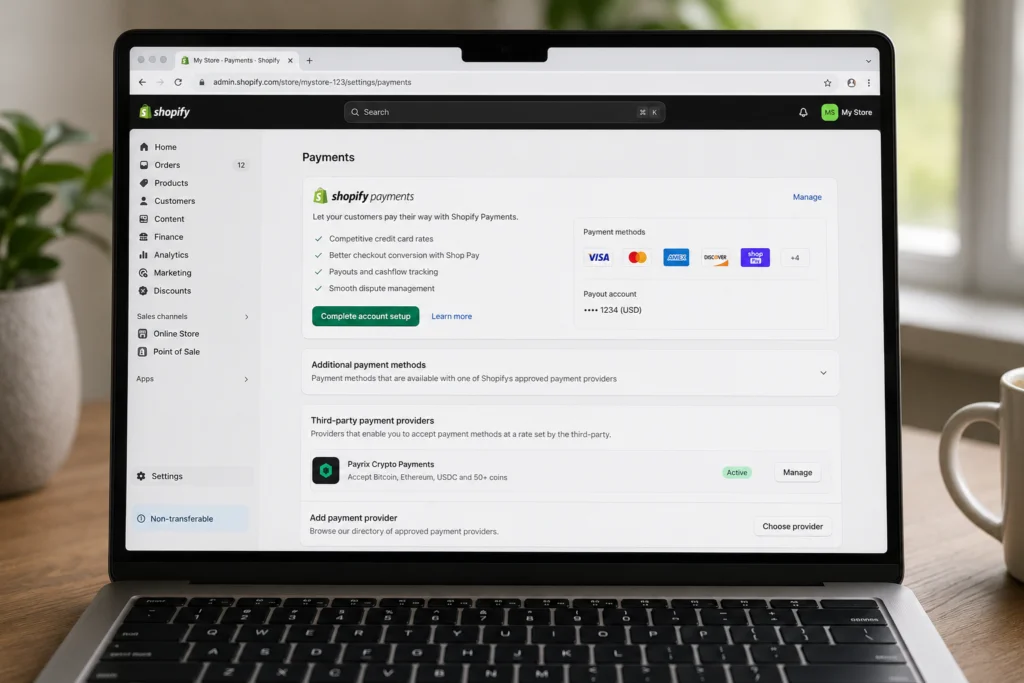
In your Shopify admin panel, go to Settings > Payments. Scroll down to Third-Party Providers, and you should see your newly installed gateway listed.
Click Activate and confirm. The crypto payment option will now appear at your checkout alongside your other payment methods.
CRITICAL SECURITY CHECK: Verify the ‘Last Update’ date for any plugin. Avoid any integration that has not been updated within the last 90 days, as abandoned plugins pose a significant security risk for checkout flows.
Step 5: Test It in Sandbox Mode
Every reputable gateway provides a sandbox or test mode where you can simulate payments without using real money. Use this before going live.
Place a test order on your store, select the crypto payment option, and complete the payment using the test credentials the gateway provides.
Then check that your store correctly marks the order as paid and updates the order status. If the order does not update automatically, your webhook is not configured correctly, and you need to fix that before going live.
Adding crypto payments to your Shopify store requires choosing a compatible gateway, installing the app from the Shopify App Store, configuring your API keys, and enabling the payment option at checkout. The friction is not technical. Plugins have made integration genuinely straightforward. The real challenge is knowing which plugin to pick and what to set up on the compliance side before going live.
How to Add Crypto Payments to Your WooCommerce Store
WooCommerce gives you more flexibility than Shopify, but also more responsibility. Here is the process from start to finish.
Step 1: Choose a Plugin That Is Actually Maintained
CRITICAL SECURITY CHECK: Verify the ‘Last Update’ date for any plugin. Avoid any integration that has not been updated within the last 90 days, as abandoned plugins pose a significant security risk for checkout flows.
This is the most important decision you will make in this process. An outdated or abandoned plugin will not just fail to work.
It can break your entire checkout. When evaluating a WooCommerce crypto plugin, check three things:
- Last update date: The plugin should have been updated within the last three months. Anything older than six months is a risk on an actively maintained platform like WordPress.
- Active installations and ratings: Plugins in the official WordPress repository show active installation counts and user ratings. A plugin with under 500 active installs and reviews from two years ago is not being actively supported.
- Developer responsiveness: Check the support tab in the WordPress repository. If questions go unanswered for months, that tells you everything about the support you will get when something goes wrong.
The options that meet these criteria in 2026:
- CoinGate for WooCommerce: Actively maintained, over 2,000 active installs, supports 70-plus cryptos, auto-converts to fiat. 1% fee.
- NOWPayments for WooCommerce: 0.5% fee, supports stablecoins including USDT and USDC, flexible settlement options.
- BTCPay Server: Self-hosted, zero fees, full sovereignty over your funds. Technically more involved to set up, but the only option that charges nothing per transaction.
- CoinsPaid: Strong compliance credentials, institutional-grade infrastructure, fiat settlement in EUR and USD. Better for higher-volume WooCommerce stores.
Also Read: Understanding Crypto Price Analysis for Market Trends and Trading Insights in 2026
Step 2: Install the Plugin
In your WordPress admin dashboard, go to Plugins > Add New. Search for your chosen gateway by name. Install and activate it.
Alternatively, if the plugin is not in the WordPress repository and is downloaded from the gateway’s website directly, go to Plugins > Add New > Upload Plugin and upload the ZIP file.
Step 3: Configure the Plugin Settings
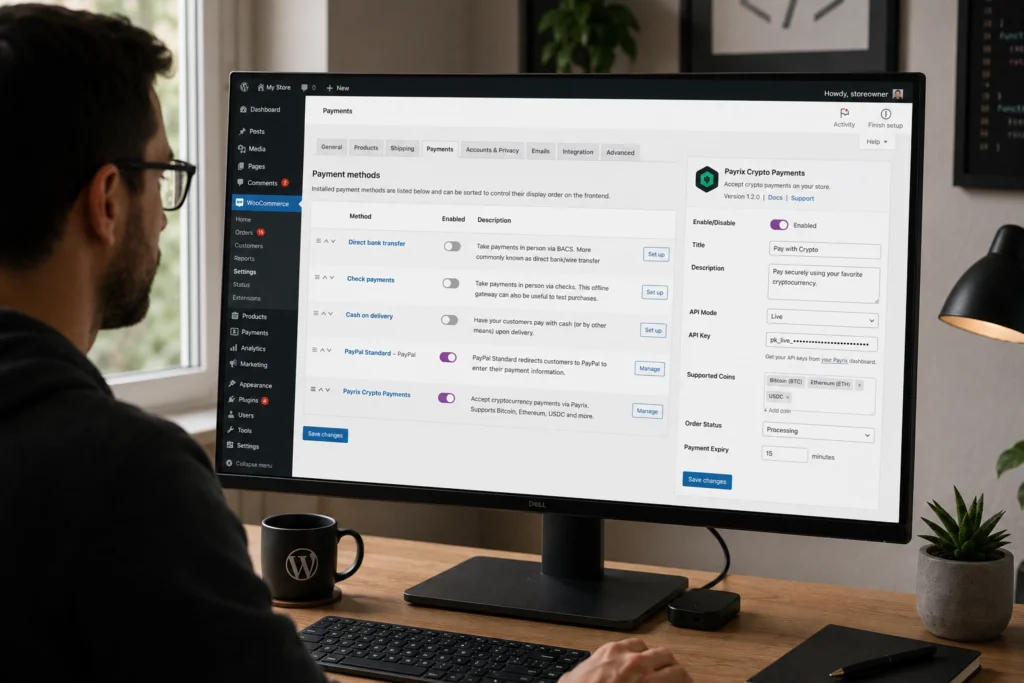
After activation, navigate to WooCommerce > Settings > Payments. You will see your new gateway listed. Click Manage to open its settings. You will need to:
- Enter your API key and secret from your gateway merchant dashboard.
- Select which cryptocurrencies to accept. If you want to accept stablecoins only and avoid volatility, restrict the options to USDT and USDC here.
- Set your settlement currency. Most gateways let you choose between settling in crypto (you hold what customers pay) or fiat (the gateway converts immediately and sends pounds or dollars to your bank).
- Configure your payout schedule. Options typically range from daily to weekly. Match this to your cash flow requirements.
- Set the order status mapping. Tell the plugin what order status to assign when a payment is received, confirmed, and failed. This determines how your store manages fulfilment automatically.
Step 4: Set Up Your Webhook
A webhook is the mechanism that tells your WooCommerce store when a payment has been confirmed.
Without it, your store will not know the payment arrived, and the order will stay in a pending state indefinitely.
In your gateway dashboard, find the webhook or callback URL section and paste in the URL that your plugin provides, usually visible in the plugin settings page.
The URL typically looks like: yourstore.com/?wc-api=yourngatewayname.
This step is where most WooCommerce crypto integrations fail silently. If the webhook is not correctly configured, test payments appear to go through from the customer’s side, but the order never updates in your admin panel.
Always verify the webhook is working in your test environment before going live.
Also Read: List of Cryptocurrency Stocks: A Complete Guide for Investors
Step 5: Test End-to-End
Put the gateway in test mode from the plugin settings. Go to your store as a customer, add something to the basket, proceed to checkout, and select the crypto payment option.
Complete the test payment using the credentials the gateway provides. Then go to your WooCommerce orders panel and confirm the order has moved from Pending to Processing or Completed automatically.
If it has not, the webhook is not working, and you need to troubleshoot that before switching to live mode.
Common causes of a failed webhook: your server is behind a firewall that blocks external POST requests, your hosting provider throttles inbound webhook traffic, or your WordPress installation has a security plugin like Wordfence blocking the gateway’s IP range.
Cloudways’s hosting guide notes that “crypto checkout is time-sensitive, and slow or misconfigured servers will break payment flows mid-transaction,” which is why server configuration matters as much as plugin choice.
Choosing the Right Gateway: A Practical Framework
| Factor | Options | Verdict |
|---|---|---|
| Settlement Type | Fiat (auto-converts to GBP/USD/EUR) vs. crypto custody | Fiat for most merchants — no volatility, no wallet management. Note: CLARITY Act may add reporting overhead for stablecoin holders |
| Coins to Accept | Broad multi-coin vs. stablecoins only | Stablecoins if you want stable value. BVNK 2026 — 79% of crypto-active users hold stablecoins |
| Real Cost | Platform fee + spread + payout fee | Ask for the USDT-to-GBP spread. Low headline fee + wide spread can cost more than a higher flat rate |
| Volume Fit | Low volume vs. high volume | Under £5–10k/month: managed gateway. Above it: BTCPay Server pays off. Cloudways breakdown |
| WooCommerce Plugin Quality | Active vs. abandoned plugin | Check WordPress update cadence. An abandoned plugin that silently fails orders is a liability |
Also Read: Stablecoin Market Cap 2026: The New Global Reserve?
Common Mistakes That Break Crypto Checkout
- Not testing the webhook before going live. The payment appears to go through for the customer, but your order never updates. This is the single most common issue and is entirely avoidable with a proper sandbox test.
- Showing too many coin options. Presenting 70 cryptocurrencies at checkout creates decision paralysis. Start with three to five: Bitcoin, Ethereum, USDT, USDC, and perhaps one more relevant to your audience. You can expand later.
- Ignoring the Shopify transaction fee. Shopify’s additional 0.5% to 2% on third-party provider transactions is easy to miss in fee comparison calculations. Include it.
- Using an unmaintained plugin on WooCommerce. Check the last update date before installing anything. A plugin last updated 18 months ago on a live WordPress site is a security liability.
- Not updating the refund policy. Customers assume crypto refunds work like card refunds. They do not. If you do not tell them up front, you will deal with disputes.
- Skipping KYC on the gateway side. All regulated gateways require business verification. Trying to shortcut this means accounts get suspended at the worst possible time. Complete verification properly before going live.
A great website or product means nothing if customers cannot complete a secure and reliable transaction at checkout. Payment gateway integration must be treated as a critical business function, not an afterthought. Merchants who prioritise secure configuration, test thoroughly, and align their gateway setup with their platform will outperform competitors struggling with technical issues at the point of sale.
Conclusion
The merchants who figured out card payments before everyone else didn’t just add a checkout option, they unlocked a customer base. The same shift is happening now, quieter but faster.
AI agents don’t browse, they transact. And when one arrives at your store looking to complete a purchase on behalf of a real customer, the only question that matters is whether your infrastructure is ready to say yes.
Learning how to integrate crypto payments with Shopify and WooCommerce is how you answer that question before it gets asked